OZEKI Phone
Koneksi VoIP Phone ke IPPBX Ozeki Phone
How to connect a Desktop VoIP Phone to the Ozeki Phone System XE
Due to its great flexibility, the Ozeki Phone System XE enables to connect desktop and mobile phones as well to your PBX. This guide focuses on VoIP desktop phones and describes what you need and how you should configure your desktop IP phone in order to integrate it into your telecommunication network. To achieve this objective, you need a desktop IP phone (such as Grandstream GXP2000 in our example) and an Ozeki Phone System XE installed on your Windows PC.
Do you need a Mobile Extension? Click here
Video tutorial:  How to connect a Desktop VoIP Phone to the Ozeki Phone System XE
How to connect a Desktop VoIP Phone to the Ozeki Phone System XEWhat you should do to create a connection
Step 1: Create a SIP account in Ozeki XE
Step 2: Configure your Desktop Phone Step 3: Setup dial plans Step 4: Make a test call |  |
Step 1: Create a SIP account in Ozeki XE
In order to connect your desktop VoIP phone to Ozeki Phone System XE, first you need to create a SIP Extension. You can find a detailed guide on how to create a SIP Extension here.
Step 2: Configure your Desktop VoIP Phone
After you have connected your phone to the VoIP network with the proper cables, the system will assign an individual IP address to the phone by using DHCP. If you use a Grandstream GXP2000 desktop VoIP phone, the IP address can be easily read at the display of the device (Figure 1). If you use another type of desktop phone, you may find it in the menu system of the telephone.
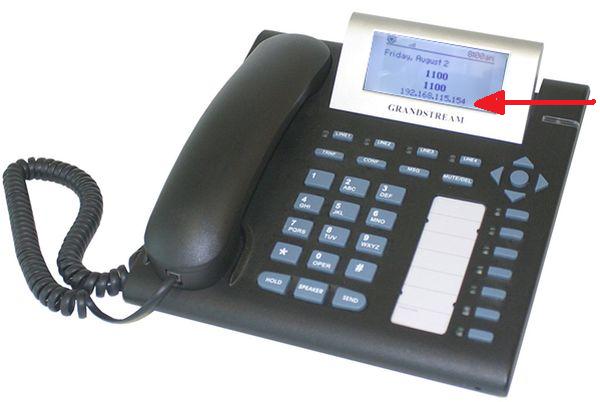
Figure 1 - IP address on a Grandstream GXP2000 desktop VoIP phone
For configuring your desktop phone, you need to open the configuration page of the phone by typing its IP address into your web browser. (In case of Grandstream GXP2000, you need to click on 'Account 1' for configuring the extension onto the Line 1.) On the configuration panel you need to specify the following information (Figure 2):
- Account Active: Yes
- Account Name: e.g. YourCompany
- SIP Server: the IP address of your Ozeki Phone System XE
- SIP User ID: the user part of an SIP address
- Authenticate ID: can be same or different from SIP User ID
- Authenticate Password: optional
- Name: optional, e.g. John Sample
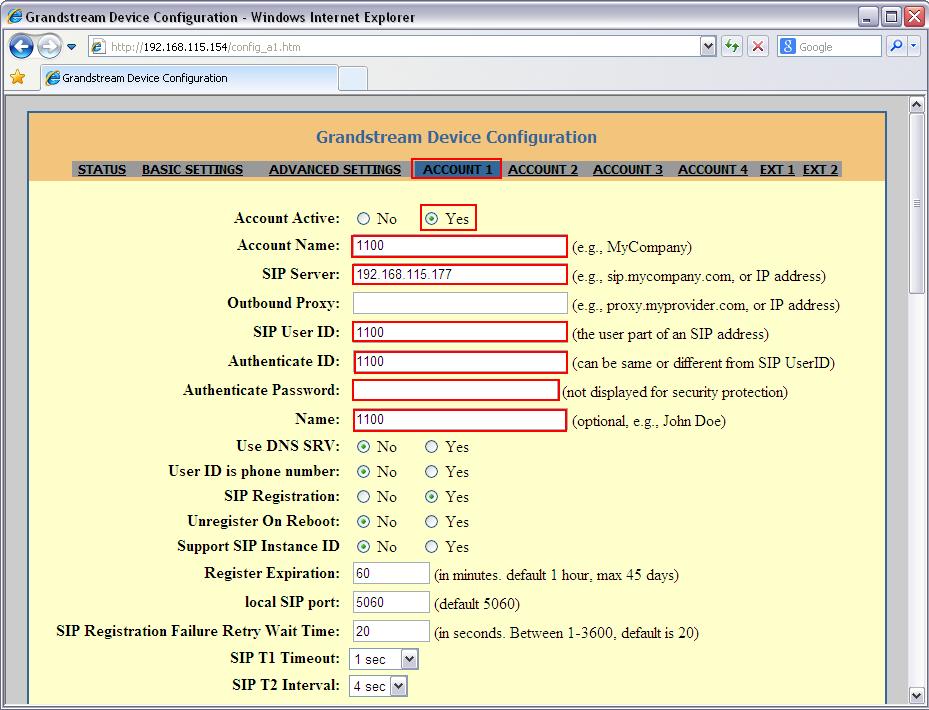
Figure 2 - Configuring a Desktop Phone (Grandstream GXP2000)
If you use another kind of desktop phone, you also need to specify a Display name, Username (Extension phone number), Password, Authentication name and the IP address of the Ozeki Phone System XE.
After specifying the SIP details, click on the 'Update' button at the bottom of the page. The phone will be booted. When it is ready, click on the 'Reboot' button.
Now return to the Ozeki Phone System XE and click on the Log button. The 'Registration accepted' message will appear, if your configuration was successful.
Step 3: Setup dial plans
By default, every extension can call every other extension. You can read more about the supported oneshere.
If you would like to change the default settings, or you would like to handle outgoing and incoming calls from outside lines, you will need to set up dial plans for that, for example:
If you would like to change the default settings, or you would like to handle outgoing and incoming calls from outside lines, you will need to set up dial plans for that, for example:
- if you would like to call telephones in PSTN or GSM networks, you need to set up Standard connections within the Outside lines panel, and you also need to set Outbound routing rules within the Dial plan panel (since the called party is not on the list of Standard extensions in the PBX).
- it is also possible that there are incoming calls from the PSTN or GSM networks. In these cases, you need to add Inbound routing rules to forward them to any of the extensions.
- if a call is not answered by the destination and you wish to forward that to an another extension (for example to a Voicemail), you need to add new Missed call rules.
- to send and receive SMS messages, you need to add new Message routing rules.
You can read more about dial plans and call routing rules here.
Step 4: Make a test call
In order to make a call, dial the phone number of your new extension by using an other extension of your VoIP network. (In our example the No. 1200 extension dialled the new No. 1100 Desktop VoIP Phone extension.) Figure 3 shows that the whole call process can be tracked in the Log panel of your extension. 'Incoming call received' message indicates that an incoming call is in progress. 'Call established' message shows that the incoming call has been answered. After finishing the call, the 'Call completed' message will appear.
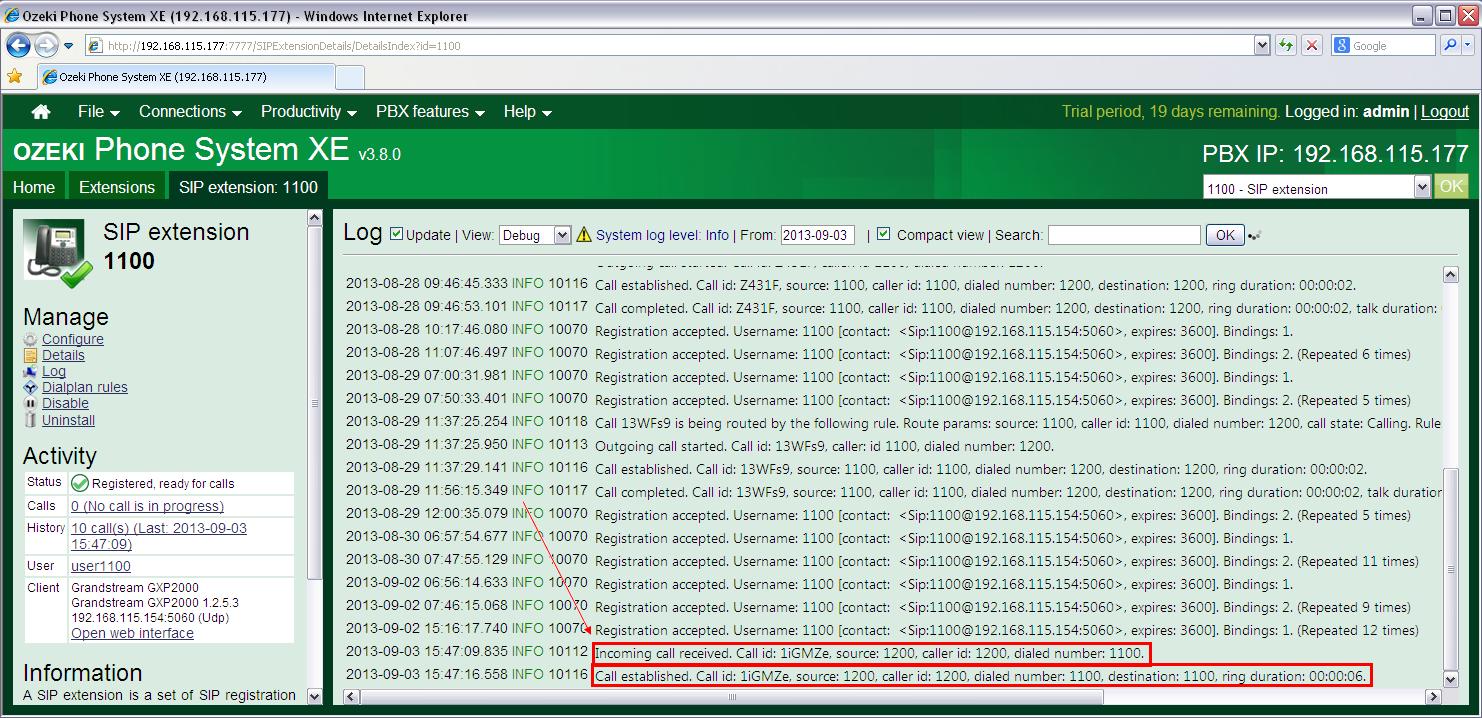
Figure 3 - Test call log
Conclusion
The guide above presented that Desktop VoIP Phones can be easily connected to the Ozeki Phone System XE. If you follow that step-by-step, you will be able to install a new SIP extension in the PBX and configure your phone on its web GUI quickly. That's it. After that, your phone will be ready to use.
You have provided valuable data for us. It is great and informative for everyone. Keep posting always. I am very thankful to you. business phone service houston tx
ReplyDeleteThe delightful article you have posted here. This is a good way to increase our knowledge.Dedicated Fiber Internet Access Continue sharing this kind of articles, Thank you.
ReplyDeleteClearly, It is an engaging blog for us that you have provided here about Business VoIP Phone Service Auckland This is a great resource to enhance our knowledge about it. Thank you.
ReplyDeleteI look forward to more such tips from you. You can check out my blog Cloud Pbx for small business .
ReplyDelete